
NPT, SAE & Flange - Installation & Care Guide
(Download NPT, SAE & Flange Installation & Care Guide in PDF)
TRICLAMP HAS SEPARATE INSTALLATION GUIDE
Download Triclamp Installation and Care Guide
SAFETY
Pressure and vacuum systems are inherently dangerous, and proper precautions need to be taken when using Rayotek sight windows. If not properly handled or installed, sight windows can be dangerous. Safety glasses should be worn when working with or around Rayotek sight windows, in addition to any other personal protective equipment (PPE) necessary for the application. Failure to follow these procedures could cause bodily harm and/or death.
CARE
Handling
Rayotek sight windows are designed and manufactured to be robust and reliable once installed. However, sight window integrity can be compromised by impacts with a hard or sharp object. Even if no damage is visible on the clear aperture or threads, damage may be present.
Never slide the face of sight windows across any hard or abrasive surfaces, as scratching may occur.
Any damage that occurs during the handling or installation of a sight window voids the warranty. User takes full responsibility and risk if a damaged sight window is installed. Use of a damaged sight window is not recommended and Rayotek will not be held liable for any damages or injuries resultant of such use.
Contact Rayotek if you have any questions about the handling of sight windows.
Cleaning
Rayotek sight windows are cleaned like any other optical glass. Use a soft cloth (e.g., microfiber or lens cloth) with a cleaning solvent such as isopropyl alcohol, methanol, acetone, commercial degreaser, or mild dish soap.
Do not use paper towels, toilet paper, tissue paper, or any other paper/cloth not designed for optical cleaning purposes. Some window materials, such as zinc selenide (ZnSe), are very soft and are scratched very easily.
Contact Rayotek if you have any questions about the cleaning of sight windows.
Inspection
Rayotek sight windows are inspected, and pressure tested at Rayotek’s facility before packaging and shipping. However, damage could occur during shipping, so inspect carefully upon receipt.
For threaded sight windows inspect the threads for any signs of damage.
Inspect O-ring sealing surfaces on flanged and SAE windows to ensure there is no damage to the sealing surfaces.
Inspect clear apertures to ensure there is no visible damage. For soda lime fused (SLF) windows, bubbles at the glass-to-metal interface, annular cracks, and sight aberrations are normal occurrences that happen due to the fusing process. These are superficial and do not affect the performance of sight windows.
Never use sight windows if there is any visible or known damage beyond these normal features. If any damage is found or there is concern about the integrity of a sight window, contact Rayotek before use.
Storage
Store Rayotek sight windows in the box they were received in or an equivalent packaging system. Do not allow sight windows to come into contact with each other or other hard objects.
Sight windows should be sealed to prevent dust collection or oxidation. Some soda lime fused windows can show surface rust if exposed to the atmosphere for extended periods of time. This is normal and does not affect the performance. However, it is best practice to keep sight windows sealed until ready for use to prevent oxidation or rust.
Some window materials are very soft and can be easily scratched or damaged.
INSTALLATION
Installation instructions vary depending on the sight window configuration. See applicable section below.
General Information for All Threaded Sight Windows
Threaded sight windows must be installed with closed-end wrenches or sockets. Figure 1 shows acceptable installation tools.
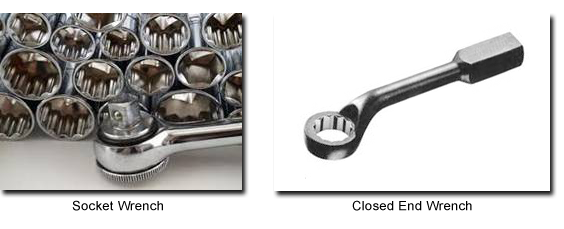
Figure 1: Approved Installation Tools
Do not use any kind of open-end wrench or impact gun to install or tighten threaded sight windows. Figure 2 shows unacceptable installation tools. Using one of these tools can damage your sight window and will void the warranty.

Figure 2: Unapproved Installation Tools
NPT Sight Window Installation
Ensure that the sight window threads and the NPT port are clean and clear of debris. Apply the appropriate thread sealant for the application (e.g., Teflon tape, anti-seize, pipe dope, etc.). NPT fittings should never be tightened without a thread lubricant/sealant or the threads will be galled, and the warranty will be voided.
Tighten the sight window finger tight until it can no longer be turned. Before proceeding with tool tightening, make a mark on the metal housing and the port to help count the number of turns that will be applied when tightening. Tighten using a closed-end wrench and refer to Table I below for the maximum number of turns and/or maximum torque values.
The values listed in Table I are the maximum allowable. Tighten only until the window is sealed. Do not exceed the maximum torque or the warranty will be void.
NPT FITTING SIZE (nom., inches) |
MAXIMUM TURNS PAST HAND TIGHT |
MAXIMUM TORQUE (ft-lb) |
1/4 |
2-1/2 |
50 |
3/8 |
2-1/2 |
50 |
1/2 |
3 |
55 |
3/4 |
3 |
60 |
1 |
3 |
65 |
1-1/4 |
3 |
70 |
1-1/2 |
3 |
75 |
2 |
3 |
85 |
Table I : NPT Installation Values
SAE Sight Window Installation
Ensure that the threads on the sight window and the SAE port are clean and clear of debris. The O-ring surface and/or groove should be smooth and free of scratches, burrs, and other damage. Ensure the O-ring is clean with no cracks or other damage. Install the O-ring carefully avoiding the threads. Lubricant/anti-seize should always be used on the sight window threads, or the threads will be galled, and the warranty will be voided.
Use a closed-end wrench and refer to Table II for the maximum torque values.
The values listed in Table II are the maximum allowable. Tighten only until the window is sealed. Do not exceed the maximum torque or the warranty will be void.
SAE SIZE (dash number) |
NOMINAL PIPE SIZE (inch) |
MAXIMUM TORQUE (ft-lb) |
-04 |
1/4 |
50 |
-06 |
3/8 |
50 |
-08 |
1/2 |
55 |
-12 |
3/4 |
60 |
-16 |
1 |
65 |
-20 |
1-1/4 |
70 |
-24 |
1-1/2 |
75 |
-32 |
2 |
85 |
Table II : SAE Installation Values
Bolted Flange Installation
Due to the variety of flange configurations, specific flanged sight window installation instructions can be provided upon customer request. Contact Rayotek if there are any questions, discrepancies, or missing documentation.
Inspect the sealing surfaces and ensure they are clean and free of nicks, burrs, and scratches. Clean with a soft cloth and mild solvent or soap (e.g., isopropyl alcohol, methanol, anti-greaser, etc.). Inspect the sealing gasket and ensure it is clean and not cracked or damaged.
Use anti-seize or another appropriate thread lubricant on bolt threads.
Install the flange and hand tighten all bolts (and/or nuts). Use a torque wrench and tighten the bolts in the appropriate pattern. Figure 3 below shows examples of bolt torque patterns.

Figure 3: Flange Bolt Torque Pattern Examples
Your flange will be supplied with the recommended torque increments and final torque values, either printed on the flange and/or in documentation supplied with your sight window. If you did not receive this information, contact Rayotek Engineering. Once the recommended torque is achieved, repeat the max torque for all bolts to ensure all bolts are properly and evenly torqued down.
Always follow the provided instructions in this document, and reference information on the sight window, to ensure proper function and sealing. If the correct torque values cannot be found, or if there is a conflict in any information provided, please contact Rayotek before installation.
Custom Sight Window Installation
For any Rayotek sight windows that do not fall into the above categories, specific instructions will be provided for proper installation and use. If the design is customer supplied, it is the customer's responsibility to ensure proper installation. If there are any concerns or if this procedure is unclear, incorrect, or inadequate, please contact Rayotek for further assistance.
WARRANTY & DISCLAIMERS
The customer/end-user assumes full responsibility for the safe and competent installation and of any sight window manufactured by Rayotek. Any injury, damage, or loss resulting from improper installation or use, is the sole responsibility of the customer/end-user.
- Rayotek Engineered Sight Windows - Rayotek warrants that all Rayotek engineered sight windows are designed and manufactured within the specifications stated by Rayotek. Rayotek warrants for one (1) year from the date of shipment to the customer that all Rayotek engineered sight windows will function reliably and safely if they are properly installed and used within Rayotek's specifications. Specifications and test data are available upon request. See Terms & Conditions for Sale at rayotek.com/terms-and-conditions.htm for warranty and liability details.
- Customer Designed/Engineered Sight Windows – Rayotek warrants for one (1) year from the date of shipment to the customer that all customer designed/engineered sight windows are manufactured to the customer's specifications. The customer takes full responsibility for any failure, injury, damage, or loss that occurs because of the customer's design, engineering, installation, and use. Any modification to a customer design recommended by Rayotek must be: 1) approved by the customer in writing (or by customer's drawing revision) and 2) the customer assumes full responsibility for the final product as a design solely originating from the customer. See Terms & Conditions for Sale at rayotek.com/terms-and-conditions.htm for warranty and liability details.
- Modifications, Changes & Damages to Rayotek Sight Windows - Any modification, change or damage to a Rayotek sight window could result in an unsafe sight window, and will void all warranties for the sight window(s). The customer/end-user takes full responsibility for any failure, injury, damage, or loss that occurs because of the use of a modified, changed, or damaged Rayotek sight window. If a Rayotek sight window is found to be damaged or is failing, it should be left in place but immediately removed from service, and Rayotek must be contacted as soon as possible to avoid failure and possible injury. See Terms & Conditions for Sale at rayotek.com/terms-and-conditions.htm for warranty and liability details.
Customer/end-user assumes full responsibility for the safe and competent installation and use of any sight window manufactured by Rayotek. Any injury, damage, or loss resulting from improper installation or use is the sole responsibility of the customer/end-user.
Thank you for the safe and productive use of
Rayotek Sight Window Products!!
Please contact us with any questions or concerns
Rayotek Sight Windows
8845 Rehco Road
San Diego CA 92121
Tel: 858-558-3671
Fax: 858-558-6213
sales@rayotek.com
Rayotek Sight Windows is a division of
Rayotek Scientific, Inc
© Rayotek Sight Windows